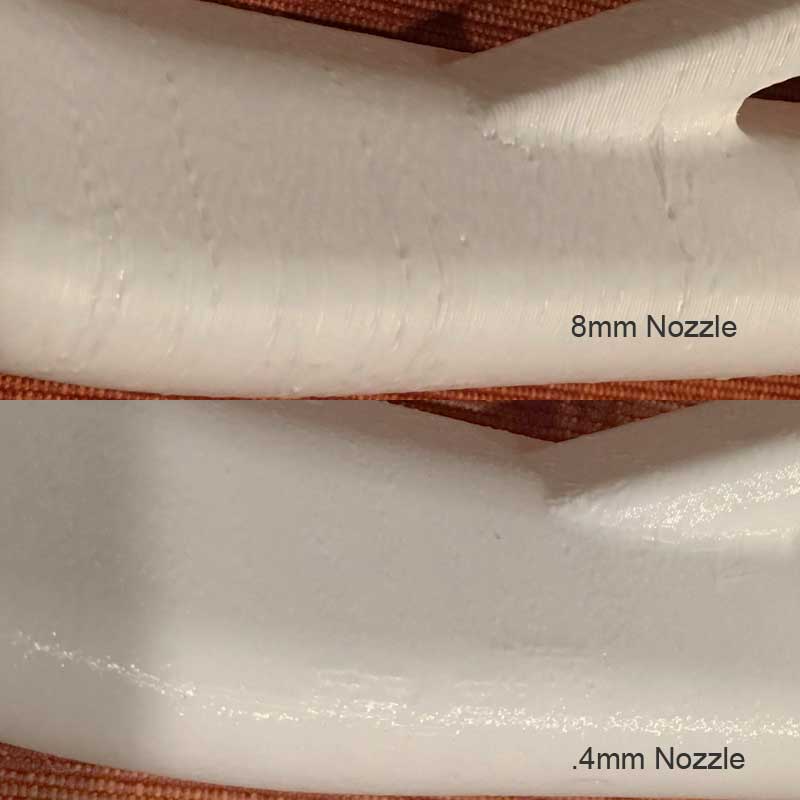
The size of the nozzle on your 3D printer can greatly affect the quality and resolution of the parts it can print. In short, the smaller the bore in the nozzle (which we’ll call “size”) the thinner the bead of plastic it will extruder. This thinner line of plastic allows the printer to create finer details, and overall tighter control over XY accuracy.
Let’s take a look at the differences in Nozzle size, and the benefits of going bigger or smaller.
Nozzle Size Differences
Most FDM 3D printers are using a .4mm nozzle, which seems to be the standard size and is a very good balance of speed and quality/detail. Since extruding plastic line-by-line is how FDM/FFF printers create parts, the thinner the lines of plastic, the more lines (and more time) it takes to create a part. A .2mm nozzle would take double the number of lines of plastic to fill the same area as a .4mm nozzle. So it would take about twice the time to print the same part.
If the same part was printed with a .8mm nozzle, the line of plastic would be twice as thick as the .4mm, which means the number of lines of plastic (and time) to print the same are would be cut in half. Though the time differences may not be absolute, the number of lines required to fill an area would be. So changing the nozzle size will always affect the resolution along the X-Y plane, and will increase or decrease the speed in which you can print.
Imaging drawing a picture using a large felt-tip marker (.8mm nozzle), a standard crayon (.4mm nozzle), and a fine-tip colored pencil .2mm nozzle). This illustrates the difference in detail and control you have based on the nozzle size. Cover a page with the large marker is ging to go much more quickly than the colored pencil, but the colored pencil is the only tool capable of producing a feature like eyelashes on the face that you’re trying to draw.
Going Larger: .8MM nozzle size
Depending on what you’re printing, going to a larger bore size on your nozzle, such as .8mm, will allow you to print the same parts in roughly half the time. You’ll also find that if you’re able to print your part in vase mode, the larger nozzle allows you to produce a much stronger and more durable structure from the single walled build. In vase mode, the print time would be about the same regardless of nozzle size, but there is a big difference in the strength (and usability) of the finished part.
Parts printed with larger sized nozzle do offer significant improvement in impact resistance.
In addition to laying down a wider line of plastic and needing to print fewer perimeters, speed can be increased with layer height as well. The typical rule for FDM/FFF 3D printing is that the layer height should not be more than 80% of the nozzle width. So increasing the nozzle width also allows you to increase the layer height.
Example:
.4mm Nozzle = max layer height of .32mm
.8mm Nozzle = max layer height of .64mm
If you take advantage of both the increased width and height, you can greatly reduce the time it takes to print your part, or enable printing at a much larger size in the same amount of time.
There are some drawbacks and limitations of using the larger nozzle. Especially noticeable on the top-side of parts, building parts out of .8mm lines means your printer will be more prone to leaving gaps when trying to create features. Generally when producing a part on a 3D printer, the toolpath that the slicer will use to produce each layer is divided into lines the size of your nozzle bore. Smaller nozzles enable your printer to create each layer using a higher number of thin lines. This is effectively “higher resolution” printing along the XY plane, and offers more accurate printing and is able to fill gaps with small, thin lines of plastic.
In contract a larger nozzle is effectively “lower resolution” printing along the XY plane, so the printer is using fewer, thicker lines to produce the same features. This can mean less detail, but also can create more gaps in your part, specifically visible on top-sides. Where a smaller nozzle would normally be able to fill those gaps with thinner lines of plastic, a larger nozzle would have to leave an empty area.
As an example, Look at the graphic below. Printing a wall that is 2mm, this is perfectly divisible by .2mm (10 lines) so the .2mm nozzle can fill this with no gaps. The .4mm can also fill this perfectly with 5 lines. Since only two lines of plastic from a .8mm will fit, your printer would likely attempt to print this wall a 2 lines of plastic with a .4mm gap in between. There may be some tricks and effects in your slicing software to help reduce the visibility of these gaps, but overall this is a limitation of FDM 3D printing, which is exacerbated by the larger nozzle size. The smaller your nozzle size, the more this issue is hidden, or basically resolved by printing in higher resolution with a small bore nozzle.
Benefits:
- Wider perimeter lines and taller layer height offer faster printing.
- Increased impact resistance
- Less likely to clog, works better with filled materials (carbon fiber, metal, wood)
Issues:
- Wider perimeter lines means support is wider and harder to remove
- Decrease in X-Y resolution. Small features cannot be accurately reproduced.
- Increased layer line visibility if using increased layer height.
- Gaps on top faces when features sizes are not divisible by the nozzle size
- Filament goes FAST! If you simply add the larger nozzle without reducing your perimeters, solid roof/floor, and infill, you’ll be using a lot more plastic in the same amount of time, and it can go surprisingly quickly.

Going Smaller: .2mm
Printing with a nozzle that has a smaller bore enables you to print finer details. The thin lines of plastic If you’re trying to reproduce some really thin walls or fine details such as small holes or very thin features, a small bore nozzle is really the only way to do this. Typically the type of prints that people would consider only suitable for SLA printing, can be possibly be done with a small nozzle on an FDM machine. A printer can only print as small as it’s nozzle bore. The smaller nozzle offers the detail, but also required double the passed of the printhead to lay down the same amount of plastic as a larger .4mm nozzle.
Below we show an example of a print produced with both a .2mm and .4mm nozzle. Up to a certain amount of detail, the .4mm can get the job done acceptably well. For finer features and thinner walls, the smaller .2mm nozzle does a much better job, and in short is able to produce the features properly. The top-sides of parts printed with a .2mm nozzle are also much nicer. If you’re trying to print a part that does not look 3D printed, without sanding or post-process, using a smaller nozzle may give the result you’re looking for. The model on the left was printed with the .2mm nozzle and was able to produce very impressive, thin-walled roses. The print on the right was printed with a .4mm nozzle, and basically made a mess of trying to produce these same flowers. The surface is also much smoother on the part printed with .2mm.

Benefits:
- Enables printing of thinner walls and finer details.
- Less gaps in your prints
- Less plastic use
- Smoother top-sides
- Easier to remove supports
Issues:
- Prints take much longer due to additional (double) printhead travel required
- Slight decrease in impact resistance compared to .4mm nozzles.
- More prone to clogs, also unable to use filled materials (carbon fiber, metal, wood)

How to choose?
After a number of prints with larger and smaller nozzles, I have still returned to using the .4mm. For parts with very fine features, the .2mm is something I do plan to keep handy. Unless you are printing very large parts, or have a specific need like wanting to print vase mode with a thick wall, the .8mm nozzle is too limited if you have fine features and detail to print.
If you’re printing with PLA or PETG only, you could settle on a small nozzle size and generally see better print quality and accuracy. If you can live with the very long print times. The smaller nozzle (and lower layer height) would represent “higher resolution” printing.
“Hold me closer tiny benchy”
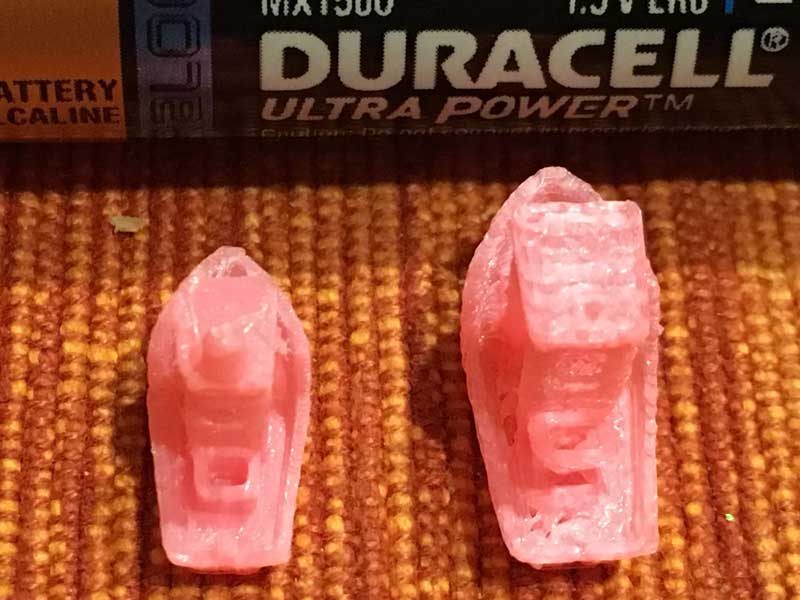
Here is a photo of a couple of tiny benchys. Boat on the left was printed with a .2mm nozzle. On the right, printed with a .4mm nozzle. You can see the smoke stack failed on the .4 version. Neither would be acceptable quality, but when pushing the limits of what is possible, we can see that much more is possible with the .2mm nozzle.
AA battery shown for scale. Nozzles used for these tests are available at Amazon.com Click HERE to order.

Nozzle Kits Available at Amazon.com
As an Amazon Associate I earn from qualifying purchases

