3D printing has been around for decades, but recently has gained popularity – and for good reason:
The technology is getting much better, and has become more accessible to the common hobbiest and maker, even for home use.
If you’re new to the concept of 3D printing, in this article I will explain how it works, the strengths and weaknesses, and how it can benefit those who use it. Generally speaking when “home users” talk about 3D printing, they are usually talking about the technology known as “Fused Filament Fabrication” (FFF) or “Fused Deposition Modeling” (FDM). There are other technologies that are starting to become popular at the consumer level, but for the most part, FDM/FFF printers are the main focus for hobbyists and home users. For a super-quick overview, here are the other technologies:
Stereo Lithography (SLA) – this uses a vat of liquid resin and a laser to solidify the shape one layer at a time. This can be a bit messy and expensive, but is great for high detail parts.
Though parts made in this technology will not be durable long-term.
Selective Laser Sintering (SLS) – this technology uses material (usually nylon) in powder form. A layer is spread and a laser fuses the powder together in the shape of your design, one layer at a time. A big advantage is that the un-fused powder is left and used as support. This makes some otherwise difficult geometries, easier to print. And a lot of the unused powder can be reused.
Parts made using this technology are usually robust, but lack fine detail. This tech is suitable for durable prototypes or even end-use parts.
Polyjet / Multi-jet printing is similar to SLA, but instead of using a laser and a vat of liquid plastic, this technology uses a large format inkjet print head to “jet” the liquid plastic on to a build bed, then fuse that liquid into solid using a powerful UV bulb. This process produces highly accurate, high-detailed part. You can also scale without adding much time to your build, so you can print one or you can print 10 of a particular part and the time to print only goes up a few minutes rather than multiplying the time the way it affects FDM. For the most parts, models printed with this technology are relatively fragile. This is good for high definition prototyping.
There are other technologies that can 3D print in color using gypsum powder (like drywall), others use paper. Some of the above technologies are modified, for example, some printers use the basic SLA technology, but use a DLP projector to project the light for an entire layer in one flash, rather than tracing the layer with a laser. Most of this is geared towards Industrial use. Though Form Labs has done a good job of making their Form 2 SLA printer a suitable model for an avid home user. For this article, we will stick with the FDM/FFF type printers. Though there are Industrial models of FDM printers available, the vast majority of these printers are desktop sized and far below an industrial caliber with regard to build quality. That doesn’t mean you can’t get industrial quality prints though… you just have to know what to look for.
The term FDM is trademarked by Stratasys and refers to their patented technology. The FFF term was later coined by the Reprap group so they could use a term to reference the 3D print technology without any legal constraints. FFF/FDM are basically an interchangeable term.
How does FDM/FFF work?
Imagine that you are holding a hot glue gun, and you squeeze out glue in the shape of a circle.
You do this over and over again, building up the height of the circle until its a tube. This is the concept of FFF 3D printing. Swap your your hand for an automated machine, trade the glue sticks for a spool of plastic filament, and put a hotter (and much smaller) nozzle at the end to extrude a small bead of plastic, and that’s a 3D printer. At its core, it’s a precise, computer controlled hot glue gun. There are a ton more features and controls on a 3D printer, but that’s the basic concept.
How does it work – in detail?
The Cartesian style 3D printer is the most popular for FDM/FFF printing. It uses the three axis Cartesian coordinate system to drive its movement.
So if you are in front of your 3D printer, the axis work like this:
X Axis – Side-to-side movement
Y-Axis – Front-to-back movement
Z-Axis – Up/Down movement
TIP
I learned this trick from a machinist some years ago. It’s probably meant for elementary school kids, but I do find that a lot of adults are not confident in their knowledge of the direction of each axis. So when in doubt, just throw up this machinist’s gang sign.
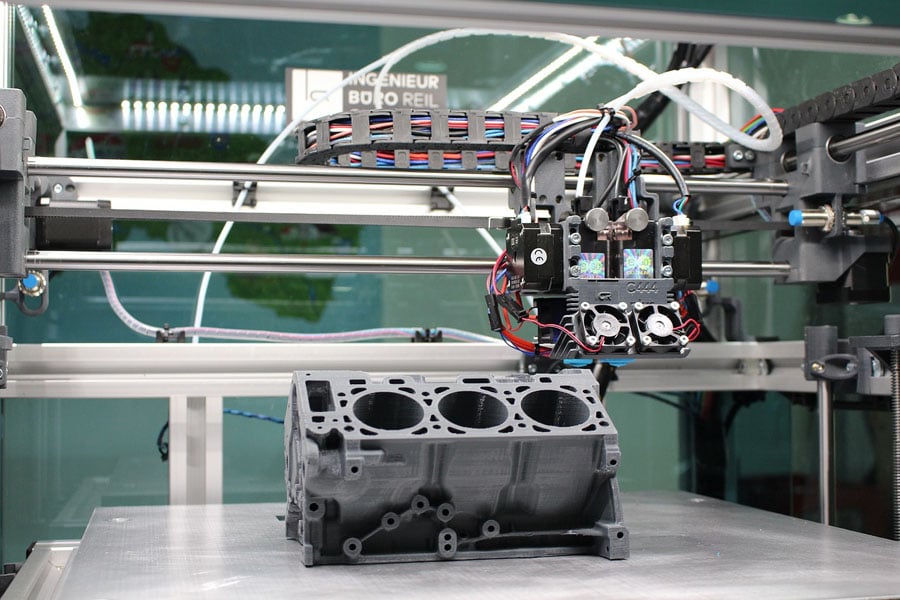
Each axis movement is usually driven by a motor and belt. The component that actually deposits the bead of plastic is a metal nozzle. Normal opening size is around .40mm-.50mm but this can vary by quite a bit. Smaller opening = thinner bead of plastic, finer detail, slower print.
Larger opening = thicker bead of plastic, less detail along X/Y axis, faster print.
This nozzle is attached to an assembly which is commonly referred to as the “print head”. Plastic filament (think thick spaghetti made of plastic) on a spool, is fed into the print head by a motor and pulley. Once in the print head, the filament passes through a headed block which turns the plastic into liquid. The pressure from the motor pushing the filament forces the molten plastic out of the nozzle and on to the print bed.
The print bed, also referred to as the “build bed” or “build plate”, is the area where the 3D printed part will attach and be build layer-upon-layer. The build plate alone is its own subject, but just know that this just needs to be a very flat and level area.
For movement, for many printers the print head is mounted to metal rods that allow it to travel along the X axis (side to side). In this case, the print bed is also on metal rods that allow it to travel along the Y axis (front to back). This allows the print head to “draw” the shape of a desired layer using coordinates on those two axis. The print head assembly, including the rods its mounted to, is typically mounted on another set of vertical rods. This allows that entire assembly to be moved up and down by another motor, this is how we get Z axis travel (Up/Down).
This is the configuration used by most RepRap and inexpensive home-user 3D printers.
Alternatively, some FFF printers are configured so the print head stays at the same height and moves along the X and Y axis, while the print bed moves only along the Z (up/down). This configuration seems reserved for higher-end printers.
There are also a number of sensors in various areas of the printer to monitor movement, temperature, etc. All of these motors and sensors are connected to a control board which sends all the commands to make the printer head up and move. The control board is driven either by a computer, or by reading files saved to an SD card. The files used to 3D print are called gcode files. Working together, the motors, pulleys, belts, and sensors enable this machine to turn a spool of spaghetti, into some amazing objects. (or a boring yoda head)
How do I 3D print something?
So what does a person need to do to 3D print? Here is the short list:
- Create a CAD file and save to STL format (or find an STL online)
- Open the STL in a slicer program
- Choose the slicer settings for your specific printer and material
- Save the design/settings as a .gcode file
- load the gcode file into your printer using an SD card
- Level the build bed and prep for printing
- Choose the gcode file on your printer – hit print.
- Pray, and watch for good layer adhesion on the first layer.
That’s a quick summary of how its done. A lot more detail goes in to each step, but to date, it’s not as easy as clicking File>Print like it is to print on paper.
How do I get starting in 3D printing?
First you need to decide if you are 3D printing for the sake of 3D printing, or if you have an end-game in mind.
Do you want to develop your own products?
Do you just want to download models from the internet and print them?
Is building a 3D printer and “seeing if it will work”, the project?, or do you want it to “Just Work”?
Do you want to design your own 3D models using CAD software?
The real question might be; Do I really need my own 3D printer? Or, “Can I afford the printer that will actually do what I want it to do?”
If you are looking to do product design, and you are already skilled with CAD software, it may be worthwhile to looking at a service like 3dhubs.com to send your finished CAD models and have a service produce the parts. This removes the learning curve to produce good parts and gives you access to higher-end machines.
Depending on what you need the finished parts to do, producing them on a $1,000 machine may not produce the quality or mechanical properties required.
I Just want to get in to 3D printing
Downloading models and successfully printing them is a hobby in of itself. If this is your goal, then it’s just a matter of deciding how easy and reliably you want to do this (or how much $$ are you willing to spend on the printer). Models like the Ultimaker 3 do a very good job of removing some of the pitfalls of lower-end 3D printers, and have some nice features that make it easier to be successful, even without a lot of knowledge on 3D printing. The features and reliability come with a higher pricetag though. Did you want an Ultimaker 3?, or buy four Prusa i3 printers and give them away to friends. “You get a 3D printer!… you get a 3D printer!… you get a 3D printer!”.
If you like to build and tinker, then one of the open source (generally cheaper) 3D printers may be the way to go. My first (home) printer was a Prusa i3 Mk2, and it works great (most of the time). There is a decent learning curve if you want to print with more than PLA plastic. But it can be a very reliable machine with some care.
The key is to do your homework on the capabilities of the printer, as well as easy of use and reliability. Reading review, and checking out forums is a good way to get a grasp on how much success people are having with these printers.
There are also plenty of models that cost much less than the Prusa. Just keep in mind that there are a lot of variables that affect your ability to produce a good print, and starting with inferior hardware may require some additional teaks, and ongoing care. And you may not see success from the start.
I want a tool, not a toy
Looking for something that “just works” out of the box? You’ll likely be spending a bit more, but there are many good options that use an array of sensors, and smarter software that allow for less user interaction to make for a good print. TheOriginal Prusa i3 printer mentioned above does have some of these features, but the build quality is not quite at a point where I would consider it rock solid. If you can pay a few thousand for a 3D printer, I would be looking at an Ultimaker, Lulzbot, or possibly the very solid and reliable Markforged Onyx One.
The Markforged 3D printers are basically in the category of “it always works”, due to its outstanding design and build quality, and also because it is a closed system where the manufacturer controls the hardware, software, and materials. Like buying an Apple product, you have to be a part of their entire ecosystem in order for the printer to function. But in return, you have a 3D printer that basically just makes perfect, or near-perfect parts every time with very little maintenance or user action required. Its limited to one material, so again, do your homework and see if the material properties will work for you. For example if you want to 3D print translucent unicorn horns, the Markforged is a no-go.
Lulzbot also has great build quality, but is open source, meaning you can make some upgrades to the printer and use a wide range of materials. While Ultimaker is a bit of a hybrid, allowing for other materials to be used in the printer, while also offering their own “chipped” material spools that allow for automatic detection of the filament, and the printer can adjust to appropriate settings for that material.
The common theme in 3D printing seems to be: you give up control, you gain reliability.
Know what’s out there
Also beware: It may not be the best idea to do too much homework on the high-end printers if they are way out of your budget range. While it’s good to know what’s out there, I also feel that seeing the quality of high-end 3D printers is kind of like going out to eat at an extremely good steakhouse. While I own a Prusa i3 at home, I have access to printers that cost 10x and even 100x as much at work. When I see the quality of what people on youtube consider to be “amazing” printed parts, it truly reminds me that most people view the quality of 3D printed parts relative to the printer that made it. The quality I get from my Prusa would be considered unacceptable quality from a printer that is 5x it’s cost.
The Prusa is still a great value, and had you never seen the high-end prints, you might even think this is as good as it gets.
Materials
Another thing to consider when choosing a printer, what materials do you need to print?
The most basic printers can print with material called “PLA”. (Polylactic Acid). It has a fairly low melting temp, and doesn’t give off horrible fumes like some plastics do. It’s also relatively easy to print with. PLA is very popular and works well for figurines, toys, props, and some mechanical parts (if they don’t require much durability). For functional,durable part, most people consider ABS plastic to be the standard (commonly referred to as the material used to make Legos).
ABS is difficult to print, required a good amount of tuning of settings, and an enclosed printer.
It also gives off some pretty bad fumes, so ventilation and exposure become an issue.
Most folks seem to be moving away from ABS and using PETG plastic when they need similar durable properties. PETG is easier to print, doesn’t have the fumes, and is similar to the PET plastic used to make water bottles. There are many more choices in filaments for your FDM printer, from flexible, to metal filled, to glow in the dark. Not all of these materials are possible to print on every 3D printer, so again, do your homework and consider what you want to be able to do, and make sure the 3D printer you’re considering is capable.
So where do I go from here?
If you are a techy type, or consider yourself a bit of a maker or an engineer, I say jump in to 3D printing. You can find inexpensive models, some even of good size like the CR-10. There are plenty or resources on youtube to help guide you through.
If you’re looking to design and produce something, consider if you want the hands-on experience of making it yourself, or if you just want it made. Services like 3D hubs allow you to utilize the vast army of 3D printers already out there, and in many cases they are run by folks who are already much more skilled. So the end result will be better than had you bought the same printer and tried yourself. This also means you can use your time learning CAD software or designing, rather than tinkering with a 3D printer.
I can tell you though, it is very rewarding to find a “problem” or something that needs to be replaced or upgraded, and then design and build yourself a solution. 3D printing can be fun, but can also be a power tool. The technology is progressing, prices are coming down, and the best is yet to come.